Add user management to a Next.js site with React server components, server actions, and AuthKit
The most tedious and difficult part of building a web app is authentication. But a new tool just entered the discussion that’s hoping to change that.
There are lots of options to get auth set up quickly, but they often aren’t built to handle the more complex, enterprise features that you hope to grow into over time. In the other direction, user management that’s powerful enough for a more mature company is usually so cumbersome and expensive to set up that it’s borderline foolish to start with it.
AuthKit caught my attention because its stated intention is to fit the needs of early-stage companies as well as more mature, complex use cases. They have a hosted UI for getting full-featured user management set up in a few lines of code, plus they have a full SDK for building custom user management flows and adding enterprise features like SSO. I love this, because it lines up with my views on progressive disclosure of complexity in software.
In this tutorial, you’ll use AuthKit to add user management to a Next.js project using the app directory, React server components, and server actions.
Enable authentication in your WorkOS dashboard
To enable authentication, head to dashboard.workos.com, then click the Authentication tab and make sure that at least one of the methods is enabled.
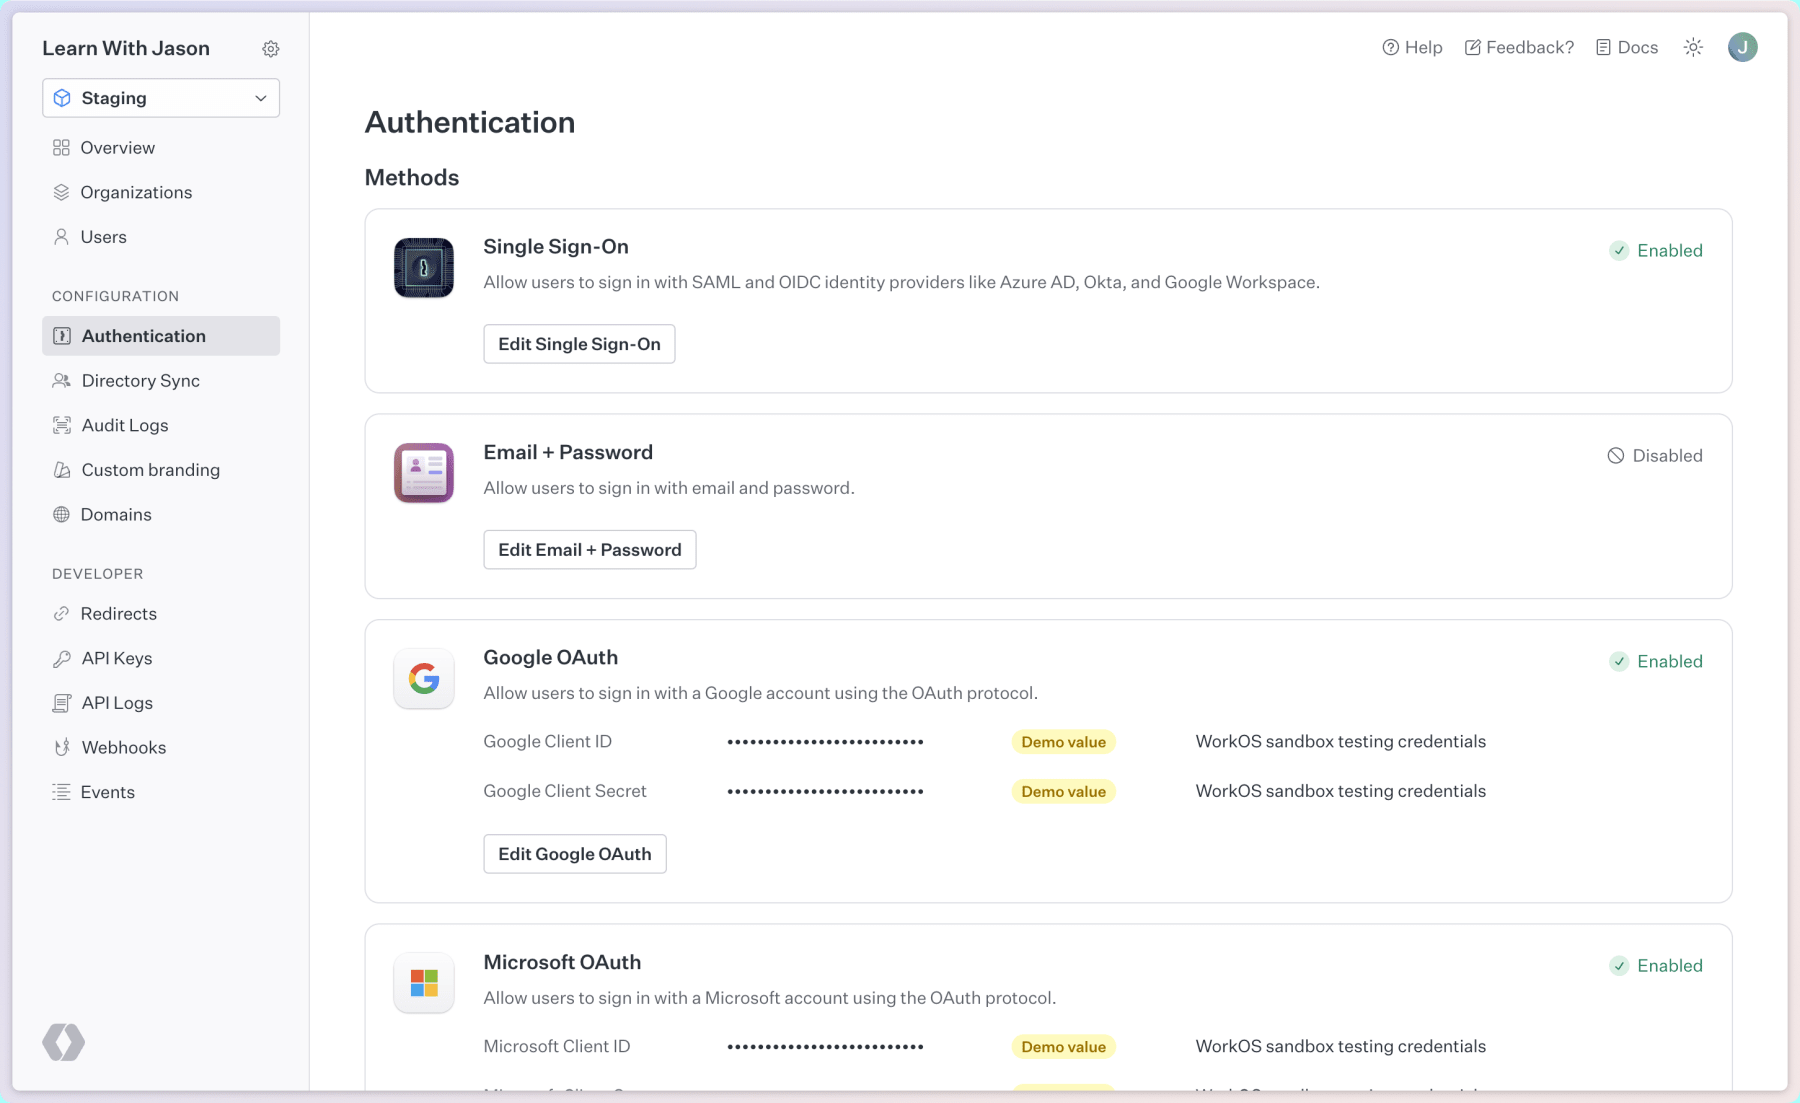
While you’re in here, also make sure to visit the Redirects tab and make sure http://localhost:3000/callback is added as a sign-in callback.
Get the project cloned and running
We’ll be starting from a modified version of the official AuthKit example app, which is built using the app directory in Next.js and Radix (the same UI library AuthKit uses to create the hosted UI). We’re not going to focus on the UI — instead, we’ll only be looking at the specific code that makes user login and session management work in the app.
To get started, clone the app:
# clone the repo using the start branchgh repo clone jlengstorf/next-authkit-example -- -b start
# move into the directorycd workos-authkit/
# install dependenciesnpm i
Next, copy .env.local.example to .env.local and add the required environment variables:
# Available in your WorkOS dashboardWORKOS_CLIENT_ID="..."WORKOS_API_KEY="..."WORKOS_REDIRECT_URI="http://localhost:3000/callback"
# Your JWT secret keyJWT_SECRET_KEY="..."
To get these values:
- Head to dashboard.workos.com and head to the API Keys tab
- Copy the Client ID from the top as
WORKOS_CLIENT_ID - Click ”+ Create Key” to generate a new API key to use as
WORKOS_API_KEY - Leave the
WORKOS_REDIRECT_URIset tohttp://localhost:3000/callback— this must match one of the callbacks in your WorkOS dashboard Redirects tab - Set
JWT_SECRET_KEYto any value — I used https://www.uuidgenerator.net/
Finally, start up local development to see the app.
npm run devOpen http://localhost:3000 to see the running site.

Get the URL for signing in or signing up via AuthKit
Our first step is to get the URL that sends a user to AuthKit’s hosted sign in/sign up flow. To do that, make the following changes in src/auth.ts:
import { cookies } from "next/headers";import { redirect } from "next/navigation";import WorkOS, { User } from "@workos-inc/node";import { jwtVerify } from "jose";
// TODO Initialize the WorkOS client// Initialize the WorkOS clientexport const workos = new WorkOS(process.env.WORKOS_API_KEY);
export function getClientId() {  const clientId = process.env.WORKOS_CLIENT_ID;
  if (!clientId) {    throw new Error("WORKOS_CLIENT_ID is not set");  }
  return clientId;}
// TODO get the authorization URL for logging in and signing up with AuthKitexport async function getAuthorizationUrl() {  const redirectUri = process.env.WORKOS_REDIRECT_URI;
  if (!redirectUri) {    throw new Error("WORKOS_REDIRECT_URI is not set");  }
  const authorizationUrl = workos.userManagement.getAuthorizationUrl({    provider: "authkit",    clientId: getClientId(),    // The endpoint that WorkOS will redirect to after a user authenticates    redirectUri,  });
  return authorizationUrl;}
export function getJwtSecretKey() {  const secret = process.env.JWT_SECRET_KEY;
  if (!secret) {    throw new Error("JWT_SECRET_KEY is not set");  }
  return new Uint8Array(Buffer.from(secret, "base64"));}
// TODO verify that the JWT is valid
// TODO determine whether a user is authenticated and return user details if so
// TODO log the user out by deleting their token
After initializing a new instance of the WorkOS Node SDK, this file also exports a new function called getAuthorizationUrl().
This function uses the user management API — WorkOS’s collection of features that make up AuthKit’s core functionality. The getAuthorizationUrl() method takes in the client ID and redirect URI (which were set via .env.local earlier) and the provider, which is set to 'authkit' to use the hosted UI.
Put this authorization URL to work by making the following changes in src/app/components/sign-in-button.tsx:
import { Button, Flex } from "@radix-ui/themes";import { getAuthorizationUrl } from '../../auth';
export async function SignInButton({ large }: { large?: boolean }) {  // TODO determine login status from AuthKit  const isAuthenticated = false;
  // TODO get AuthKit authorization URL  const authorizationUrl = "#login";  const authorizationUrl = await getAuthorizationUrl();
  if (isAuthenticated) {    return (      <Flex gap="3">        <form          action={async () => {            "use server";            // TODO log the user out          }}        >          <Button type="submit" size={large ? "3" : "2"}>            Sign Out          </Button>        </form>      </Flex>    );  }
  return (    <Button asChild size={large ? "3" : "2"}>      <a href={authorizationUrl}>Sign In {large && "with AuthKit"}</a>    </Button>  );}
Save these changes, then click the “Sign In with AuthKit” button on the home page. You’ll be redirected to the hosted sign in/sign up flow
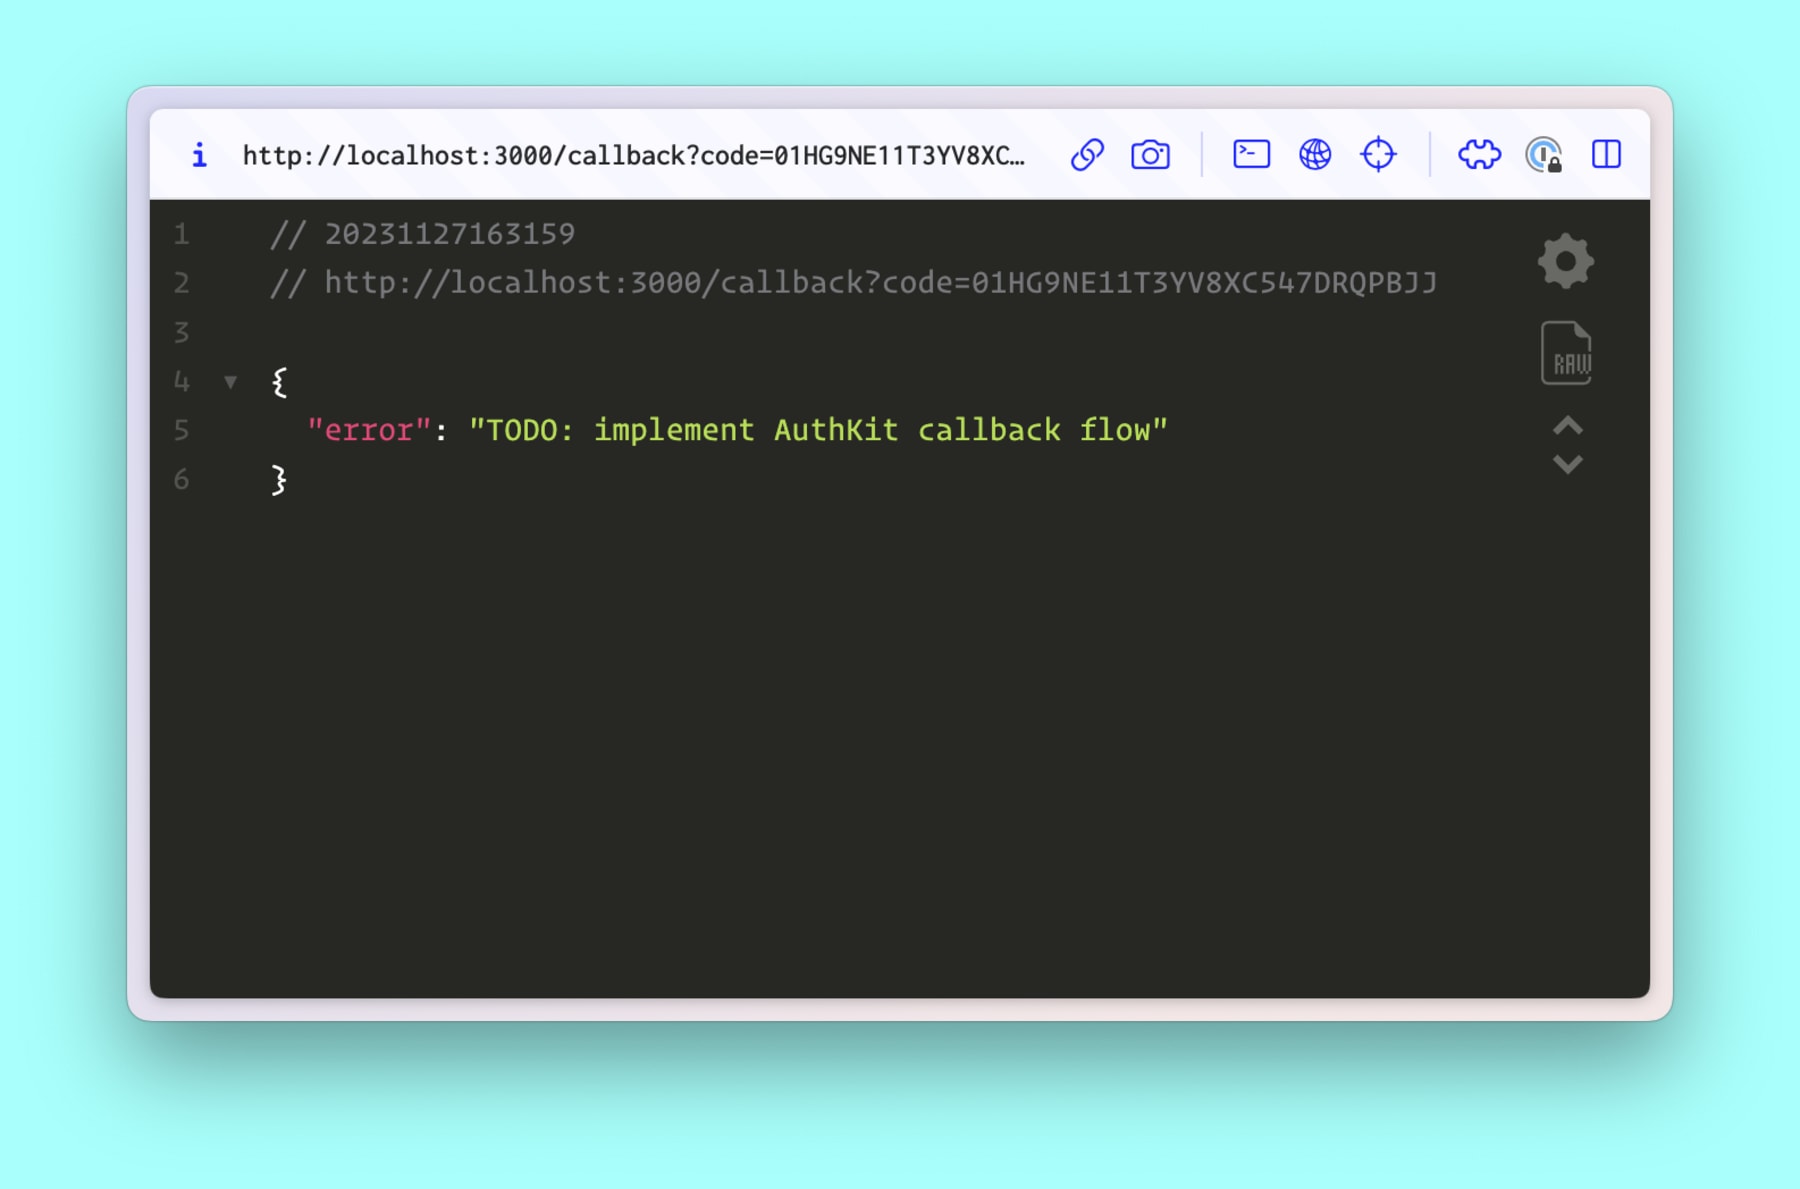
The user is authorizing the app, but there’s no handler in place to turn the authorization code into a user token. In the next step, we’ll implement the callback handler to exchange the code for a user token.
Create a callback handler for user logins
Exchange the code for user details by replacing the contents of src/app/callback/route.tsx with the following code:
import { SignJWT } from "jose";import { NextRequest, NextResponse } from "next/server";import { getJwtSecretKey, workos, getClientId } from "../../auth";
export async function GET(request: NextRequest) {  const code = request.nextUrl.searchParams.get("code");
  if (code) {    try {      // Use the code returned to us by AuthKit and authenticate the user with WorkOS      const { user } = await workos.userManagement.authenticateWithCode({        clientId: getClientId(),        code,      });
      // Create a JWT token with the user's information      const token = await new SignJWT({        // Here you might lookup and retrieve user details from your database        user,      })        .setProtectedHeader({ alg: "HS256", typ: "JWT" })        .setIssuedAt()        .setExpirationTime("1h")        .sign(getJwtSecretKey());
      const url = request.nextUrl.clone();
      // Cleanup params      url.searchParams.delete("code");
      // Redirect to the requested path and store the session      url.pathname = "/";      const response = NextResponse.redirect(url);
      response.cookies.set({        name: "token",        value: token,        path: "/",        httpOnly: true,      });
      return response;    } catch (error) {      return NextResponse.json(error);    }  }
  return NextResponse.json({    error: "No authorization code was received from AuthKit",  });}
To exchange the authorization code for user information, this code uses the authenticateWithCode() method.
Next, the user details are encoded into a JSON web token (JWT) using the jose package.
Once a token is created, the current URL is cloned, updated to point to the home page, and the code is deleted. This updated URL is where the user will be redirected after a successful authorization.
Finally, the token is added as an HTTP-only cookie before returning the response.
After saving, click the “Sign In with AuthKit” button again. You’ll end up back on the home page, which still needs changes to show a logged in user, but if you check the “application” tab in your devtools and look at cookies, you’ll see the token cookie is now present.

With the user token set, the next step is to read it and update the UI based on whether a user is logged in.
Add logic to verify and load a logged in user + log out
Now that a token is set when a user is logged in, add the logic to check and verify that token by making the following changes in src/auth.ts:
import { cookies } from "next/headers";import { redirect } from "next/navigation";import WorkOS, { User } from "@workos-inc/node";import { jwtVerify } from "jose";
// Initialize the WorkOS clientexport const workos = new WorkOS(process.env.WORKOS_API_KEY);
export function getClientId() { /* unchanged */ }
export async function getAuthorizationUrl() { /* unchanged */ }
export function getJwtSecretKey() { /* unchanged */ }
// TODO verify that the JWT is validexport async function verifyJwtToken(token: string) {  try {    const { payload } = await jwtVerify(token, getJwtSecretKey());    return payload;  } catch (error) {    return null;  }}
// TODO determine whether a user is authenticated and return user details if soexport async function getUser(): Promise<{  isAuthenticated: boolean;  user?: User | null;}> {  const token = cookies().get("token")?.value;  const verifiedToken = token && (await verifyJwtToken(token));
  if (verifiedToken) {    return {      isAuthenticated: true,      user: verifiedToken.user as User | null,    };  }
  return { isAuthenticated: false };}
// TODO log the user out by deleting their tokenexport async function clearCookie() {  cookies().delete("token");  redirect("/");}
The verifyJwtToken() function uses the jose package to make sure the token was created using the secret key set in .env.local.
The getUser() function loads the token cookie, verifies it using verifyJwtToken(), then returns an object with the current authentication status (isAuthenticated) and, when a user is logged in, the user’s details such as name and email.
The clearCookie() function deletes the cookie and redirects the user to the home page — this will be used to handle the logout action.
Only show the account details page to logged in users
For protected routes, such as the account details page, use Next.js middleware to check for a valid token and, if none is found, redirect the user to the authorization URL. Replace the contents of src/middleware.ts with the following code:
import { NextRequest, NextResponse } from "next/server";import { getAuthorizationUrl, verifyJwtToken } from "./auth";
export async function middleware(request: NextRequest) {  const { cookies } = request;  const { value: token } = cookies.get("token") ?? { value: null };
  const hasVerifiedToken = token && (await verifyJwtToken(token));
  // Redirect unauthenticated users to the AuthKit flow  if (!hasVerifiedToken) {    const authorizationUrl = await getAuthorizationUrl();    const response = NextResponse.redirect(authorizationUrl);
    response.cookies.delete("token");
    return response;  }
  return NextResponse.next();}
// Match against the account pageexport const config = { matcher: ["/account/:path*"] };
After saving, delete the token cookie in the Application tab of your devtools and try to visit the account tab — you’ll be redirected to the AuthKit authorization flow.
Update the UI to use authentication information
The last step is to make the UI react to the presence of a logged in user.
Add user details to the account page
First, make the following changes to src/app/account/page.tsx:
import { Text, Heading, TextFieldInput, Flex, Box } from "@radix-ui/themes";import { getUser } from "../../auth";
export default async function AccountPage() {  const user: any = {};  const { user } = await getUser();
  const userFields = user && [    ["First name", user.firstName],    ["Last name", user.lastName],    ["Email", user.email],    ["Id", user.id],  ];
  return (    <>      <Flex direction="column" gap="2" mb="7">        <Heading size="8" align="center">          Account details        </Heading>        <Text size="5" align="center" color="gray">          Below are your account details        </Text>      </Flex>
      {userFields && (        <Flex          direction="column"          gap="3"          style={{ width: 400 }}          justify="center"        >          {userFields.map(([label, value]) => (            <Flex asChild align="center" gap="6" key={value}>              <label>                <Text weight="bold" size="3" style={{ width: 100 }}>                  {label}                </Text>
                <Box grow="1">                  <TextFieldInput value={value || ""} readOnly />                </Box>              </label>            </Flex>          ))}        </Flex>      )}    </>  );}
The account page is only available to logged in accounts, so all it needs is the user details returned by getUser().
Turn the “sign in” button to a “sign out” button when logged in
Next, make the following changes to src/app/components/sign-in-button.tsx:
import { getAuthorizationUrl } from "../../auth";import { clearCookie, getAuthorizationUrl, getUser } from "../../auth";import { Button, Flex } from "@radix-ui/themes";
export async function SignInButton({ large }: { large?: boolean }) {  // TODO determine login status from AuthKit  const isAuthenticated = false;  const { isAuthenticated } = await getUser();  const authorizationUrl = await getAuthorizationUrl();
  if (isAuthenticated) {    return (      <Flex gap="3">        <form          action={async () => {            "use server";            // TODO log the user out            await clearCookie();          }}        >          <Button type="submit" size={large ? "3" : "2"}>            Sign Out          </Button>        </form>      </Flex>    );  }
  return (    <Button asChild size={large ? "3" : "2"}>      <a href={authorizationUrl}>Sign In {large && "with AuthKit"}</a>    </Button>  );}
This change uses the actual authenticated status to show a “sign out” button when a user is logged in. It also uses a server action to delete the token cookie when clicked, allowing the user to log out and be redirected to the home page.
Update the home page for logged in users
Finally, make the following changes to src/app/page.tsx:
import { Button, Flex, Heading, Text } from "@radix-ui/themes";import NextLink from "next/link";import { SignInButton } from "./components/sign-in-button";import { getUser } from "../auth";
export default async function HomePage() {  // TODO determine login status from AuthKit  const isAuthenticated = false;
  // TODO load user details from AuthKit when logged in  const user: any = {};  const { isAuthenticated, user } = await getUser();
  return (    <Flex direction="column" align="center" gap="2">      {isAuthenticated ? (        <>          <Heading size="8">            Welcome back{user?.firstName && `, ${user?.firstName}`}          </Heading>          <Text size="5" color="gray">            You are now authenticated into the application          </Text>          <Flex align="center" gap="3" mt="4">            <Button asChild size="3" variant="soft">              <NextLink href="/account">View account</NextLink>            </Button>            <SignInButton large />          </Flex>        </>      ) : (        <>          <Heading size="8">AuthKit authentication example</Heading>          <Text size="5" color="gray" mb="4">            Sign in to view your account details          </Text>          <SignInButton large />        </>      )}    </Flex>  );}
This swaps out the hard-coded values for real login status and user details. Save to see the user details displayed on the home page when a user is logged in.
Going further with user management
As your app grows, you may want to add new features or customize how things look. This is where AuthKit is uniquely valuable, as far as I can tell.
Bring your own UI
If you want to customize the UI instead of using a hosted workflow, the user management APIs are available in the WorkOS Node SDK to do anything AuthKit can do within your own UI.
I won’t go into how, but they have a ton of examples up on GitHub to get you started.
Add enterprise features
You might have spotted it when you enabled authentication in your WorkOS dashboard, but adding enterprise user management features like single sign-on is a checkbox away. For more details, check out my tutorial on SSO with WorkOS in a Node app.